
How Much Does It Cost to Recaulk a Shower?
If you’re a Brampton or GTA homeowner looking at a cracked or peeling caulk line around your tub or shower, the honest answer is: it depends on what’s hiding underneath. A simple spot repair might cost $120 to $220. A full tub-to-wall reseal typically runs $250 to $400. And the “it’s worse than it looked” job that most people don’t expect can land anywhere from $400 to $700 or more.
I quote by the project, not by the hour, and materials are included in the price. I’d rather tell you “my range is $250 to $400 depending on what I find once the old caulk is off” than give you a fake exact number that changes the moment I start cutting.
This post covers how I got to those numbers, what I actually do when I walk into your bathroom, the mistakes I see over and over, and when I think you should handle it yourself versus when you should call someone.
Who’s Giving You This Advice
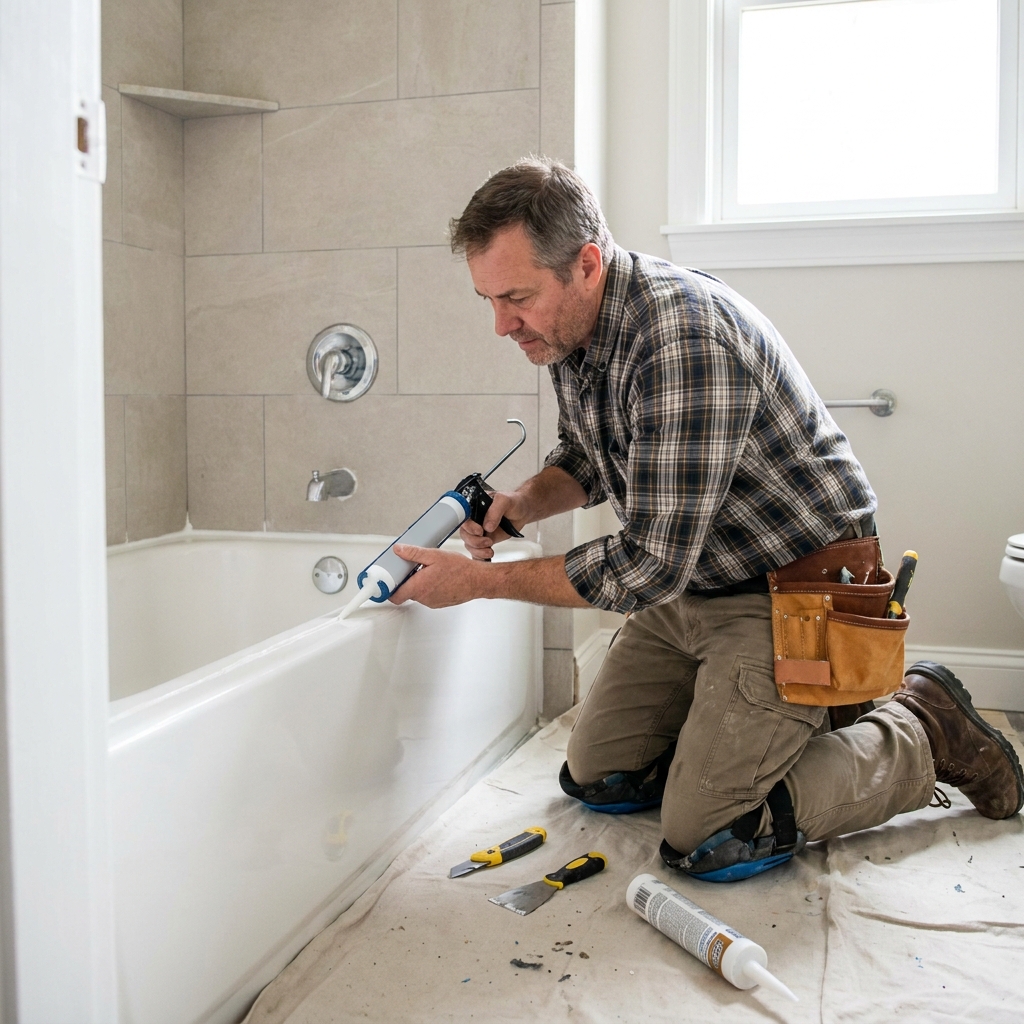
I’m a residential handyman serving Brampton, Mississauga, Oakville, Milton, and the wider GTA. I’m not a licensed plumber or tile contractor. I’m the guy homeowners call when they want a clean, durable finish on the small-to-mid jobs that keep homes tight, dry, and move-in ready. Caulking is one of the core services I run, alongside carpentry, drywall patches, door adjustments, shelving, and bathroom and kitchen touch-ups.
I’ve personally recaulked 50+ bathrooms across GTA homes over the years, including full reseals, spot repairs, and maintenance calls. Most of my shower and tub work uses 100% silicone or high-quality bathroom sealant, with full removal of the old bead, proper cleaning, drying, and sometimes mildew treatment before the new caulk goes in.
My approach is practical and prevention-focused: remove the old, failing material properly, prep the surface, use the right product, and seal it so moisture doesn’t sneak behind and cause mold or rot. I treat caulking as a protective barrier first and a finish second. I’ve handled plenty of jobs where cracked caulk was dismissed as “cosmetic,” only to find moisture damage once the old bead came off.
A Real Job That Wasn’t Just a Cosmetic Fix
A Brampton homeowner in a 2000s-era semi called me about what they thought was a simple fix. The silicone bead around their built-in tub had cracked and pulled away along the long wall and both ends. They expected a quick Saturday job: scrape out old caulk, lay down a fresh bead, done. Their budget in their head was a couple hundred dollars.
Here’s what I found once the old caulk came off:
- A continuous gap between the tub flange and the backer board. Water had been tracking behind the tub surround for months.
- Visible mold on the drywall behind the tub apron, a musty smell when I pulled the access panel, and soft drywall at the bottom edge where it met the tub.
- Tub flex under load. The tub wasn’t massively shifting, but it had enough give when stood on that it was breaking the seal at the wall. That’s the classic “looks fine until you load it” movement.
Here’s what we ended up doing:
- Demo and dry-out. I removed the old caulk fully, cut out the water-damaged section of drywall along the tub wall (about an 18-inch-high strip along the long side), and let the cavity air out.
- Substrate repair. I replaced the bad drywall with moisture-resistant board, sealed the tub-to-wall joint properly, and made sure the flange was tight so the tub wasn’t flexing as much under load.
- Proper reseal. I used 100% bathroom silicone, tooled the bead for a tight seal at the tub-to-wall and corners, and advised the homeowner to keep the area dry for 24 hours before using the shower.
Time on site was about 3.5 to 4 hours, spread over part of a day so the area could breathe before sealing.
What they expected to pay: low hundreds. What it actually cost: mid to high hundreds, more than a simple bead but far less than calling in a full bathroom renovation crew or dealing with a mold remediation company later.
The takeaway I gave them: they thought they were paying for a cosmetic bead. What they actually paid for was stopping an active moisture path and preventing a much bigger repair bill down the road. In Ontario’s climate, with showers used daily, a failed tub or shower caulk line is rarely “just cosmetic” for long.
What Those Pricing Ranges Actually Mean
Simple Spot Repair: $120 to $220
This job looks like one or two short sections, maybe a 6 to 12-inch gap at the corner of a tub or a small section along the front edge. The old caulk is mostly intact, with no major mold, no soft drywall, and no loose tub.
What I do: remove the failed section, clean the joint, let it dry, and lay a fresh bead.
The lower end applies if I’m already in the neighbourhood or combining it with other small tasks. The higher end covers stubborn old caulk that needs extra time to remove cleanly, or travel and parking in the GTA. You’re not paying for the tube of silicone. You’re paying for correct removal, surface prep, and a bead that actually lasts.
Full Tub-to-Wall Reseal: $250 to $400
This is the most common “book the handyman” scenario. The homeowner knows the caulk is failing around the whole tub and wants it done right in one shot. A standard built-in tub in a 5×8 ft bathroom, with old caulk removed from all four sides: the back wall, both ends, and the front apron joint. Clean, dry, a light mildew treatment if needed, then a continuous silicone bead around the tub-to-wall joints.
What drives the price within the range:
- How much old caulk needs to come out
- The number of inside and outside corners
- Accessibility, whether it’s a tight ensuite or a spacious main bathroom
- Multiple layers of old sealant from previous jobs, which is more common in older GTA homes
“It’s Worse Than They Thought”: $400 to $700 or More
The homeowner thinks it’s a simple recaulk, but once the old bead is off, there’s mold on the backer board, soft or crumbling drywall at the tub edge, a visible gap between the tub flange and the wall, or tub movement under load that’s been breaking the seal.
What gets added:
- Cutting out and replacing a strip of damaged drywall or backer board
- Extra drying time and possible mildew treatment
- More careful sealing of the tub-to-wall joint to account for tub movement
This is the mid-to-high-hundreds job from the case study above. It’s more than a cosmetic bead, but it’s still a fraction of what a full bathroom renovation or professional mold remediation would cost. Catching it at this stage is the best leverage you have.
What You’re Actually Paying For: My Process Step by Step
When you see a $250 to $400 line item for a “tub recaulk,” here’s what’s happening on the other end of that invoice. This is the process I actually run on jobs, not the sanitized YouTube tutorial version.
Step 1: Inspection Before I Touch Anything
Before I cut a single strip of old caulk, I:
- Run my finger along the joint to feel where it’s lifted, soft, or spongy
- Check the tub flange area for movement by pressing on the tub edge and watching the joint
- Look for staining, soft drywall, or a musty smell that hints at water behind the wall
If I see red flags, I tell the homeowner up front that this might turn into a “worse than it looked” job once the old caulk is off. No surprises on the invoice. Then I clear the area: remove bottles, mats, and curtains, lay down a drop cloth, and make sure I have good light so I can see every bit of old residue.
Step 2: Removing the Old Caulk
I don’t just slice the top and hope for the best. The goal is to get down to clean, solid substrate on both sides of the joint.
- First pass: a sharp utility knife or a 5-in-1 tool to cut along both edges of the bead and lift out the bulk of the old caulk in strips.
- Second pass: for stubborn sections, especially in the corners and along the tub flange, a dedicated caulk-removal tool or plastic scraper to avoid gouging the tub or tile. In tight spots, a small oscillating tool with a fine blade can help, but I’m careful not to scratch acrylic or fiberglass surrounds.
- Final clean-out: back with the knife at a shallow angle, roughly 20 to 30 degrees, to scrape off any thin film or “skinned” residue. The joint should feel rough and solid, not slick or rubbery.
By the end, there should be no visible chunks or shiny strips of old silicone left in the joint. If I can still see or feel old caulk, I keep going.
Step 3: Cleaning the Joint (Where Most DIY Jobs Fail)
Clean doesn’t mean “looks okay.” It means chemically clean and dry.
- I wipe the joint thoroughly with a dedicated bathroom cleaner or mildew-fighting spray to break down soap scum and surface mold.
- Then I go over it with rubbing alcohol or a similar solvent on a clean rag to remove any remaining film and ensure good adhesion.
- I wipe, wait a minute, then wipe again with a fresh part of the rag. I’m looking for a rag that comes away clean, not grey or slimy.
After cleaning, I let the joint air-dry and do a touch test: the surface should feel completely dry and slightly “toothy,” not cool or damp. In humid GTA bathrooms, I’ll often run a small fan or open a window to speed this up rather than rush the seal.
Step 4: Taping and Handling the Tub Flange Edge
I use painter’s tape on most full reseals because it gives a crisp, consistent line and protects the tub finish.
- I tape along the tile just above the joint and along the tub surface just below where the bead will sit, leaving a consistent gap, usually about 3 to 5 mm depending on the joint size.
- At the tub flange specifically, I make sure the tape is pressed down firmly so silicone can’t sneak under it. The goal is a clean edge right at the transition from tub to wall, with the bead fully bridging the joint.
If the old caulk line was uneven or too wide, I adjust the tape spacing so the new bead isn’t ridiculously thick. A fat bead isn’t stronger. It just cures slower and looks messy.
Step 5: Applying and Tooling the Bead
I use 100% silicone labelled for kitchens and bathrooms. I cut the nozzle at a 45-degree angle, just slightly smaller than the joint width so I can control the flow.
- Application: I lay down the bead in one continuous pass per side when possible, keeping steady pressure on the gun so the silicone fills the joint from the bottom up, not just sitting on top. Corners get extra attention so there are no voids.
- Tooling: immediately after laying the bead, I tool it with a smooth, slightly wet finger or a plastic tooling tool. I lightly mist my finger with soapy water so the silicone doesn’t stick, then run it along the bead in one smooth motion to press it into the joint and create a concave profile.
- Tape removal: I pull the tape off right away, while the silicone is still wet, peeling back at a sharp angle so I don’t drag silicone onto the tile or tub. This leaves a clean, straight edge on both sides.
If I see any pinholes or gaps after tooling, I add a tiny amount of silicone and re-tool just that spot. The finished bead should look uniform, with no breaks, bubbles, or thin sections.
Step 6: Final Check and What I Tell You After
Before I pack up, I:
- Visually inspect the entire bead under good light
- Run a finger lightly along it to confirm it’s smooth and fully bonded at the edges
- Wipe away any stray smears on the tile or tub before they skin over
Then I give you clear do’s and don’ts.
Do:
- Keep the bathroom well-ventilated during and after the job
- Wait at least 24 hours before using the shower; 48 hours is better in humid weather or if the bead is on the thicker side
- After the first few showers, quickly squeegee or wipe the joint to reduce standing water while the silicone fully cures over the next few days
Don’t:
- Run a hot, steamy shower the same day
- Spray cleaners, bath oils, or bath bombs into the tub for the first 48 to 72 hours
- Scrub the new bead aggressively for the first week; gentle rinsing is fine, but no abrasive pads or harsh chemicals right on the fresh silicone
And one thing I always tell people: if you notice the bead lifting or gaps forming within the first year, call me back. That’s usually an installation or prep issue, not normal wear, and it’s better to fix it early before water gets behind again.
The Four Caulking Mistakes I See Over and Over
These are the repeats I see from homeowners and even some trades. If you avoid all four, your caulking will outlast 90% of what I see in older Brampton and Mississauga homes.
- Caulking over old caulk. People just run a new bead on top of the old one. That traps moisture, creates an uneven surface, and guarantees premature failure. Proper removal is non-negotiable.
- Skipping surface prep. Not cleaning off soap scum, mildew, and residue, or not letting the joint dry before applying silicone. That alone kills adhesion in GTA bathrooms.
- Using the wrong product. Acrylic or “kitchen and bath” latex caulk in a high-movement, constantly wet shower joint. It looks fine for a bit, then cracks and peels as the tub moves and humidity swings.
- Thick, messy beads that look “sealed” but aren’t. A giant glob of silicone on the surface doesn’t mean the joint is sealed at the critical tub-to-wall interface. Proper tooling and penetration into the joint matter more than how fat the bead looks.
DIY or Hire a Pro? Where I Draw the Line
DIY Is Fine If
- It’s a small, localized crack or gap (a few inches) and the rest of the bead is still firmly attached
- There’s no soft drywall, no spongy feel around the tub edge, and no musty smell when you’re near the joint
- You’re comfortable removing the old caulk completely, cleaning the joint well, and letting it dry before applying new silicone
Call a Pro If You See Any of This
- The caulk is failing all the way around the tub or shower, not just in one spot
- You notice dark staining, soft or delaminating drywall, or a spongy feel at the bottom edge of the wall
- There’s a visible gap between the tub flange and the wall, or the tub flexes noticeably when you stand on it
- You’ve already had one “quick recaulk” fail within a year or two
My rule of thumb: if the problem is purely surface-level and limited, a careful DIYer can handle it. If there’s any sign water’s been getting behind the wall, stop and call someone who can open it up, assess, and seal it properly.
What Product to Use (and What to Avoid)
What I Use and Recommend
100% silicone labelled for kitchens and bathrooms, with mildew resistance, for all tub-to-wall and shower joints. That’s the workhorse in my van for GTA bathrooms. I stick with reputable big-box and hardware-store silicone from major brands rather than no-name tubes. In this category, brand consistency and freshness matter more than chasing the absolute cheapest option. And check the expiry date; expired silicone can and does fail.
What I Warn People Away From
- Acrylic or latex “paintable” caulk in shower and tub joints. It’s fine for baseboards or low-moisture trim, but not for a wet, flexing shower surround.
- “Quick fix” caulking sticks or peel-and-stick strips as a permanent solution. They can be a temporary patch in a pinch, but they’re not a proper seal and often trap moisture behind them.
If a friend asked me what to buy, I’d say: get a good 100% silicone, take your time on removal and prep, and don’t cheap out on the tube for a job that’s protecting your walls from water.
How Often Should You Recaulk?
I don’t believe in rigid “every X years” rules, but in Ontario’s climate, here’s my practical stance:
- Inspect at least once a year, ideally in spring or fall. Run your finger along the joint and look for gaps, cracks, peeling, or sections pulling away from the surface.
- Plan on resealing every 3 to 5 years for a typical shower or tub that sees daily use, sooner if you notice early failure signs.
- Recaulk immediately if you see sections lifting off the tub or tile, visible gaps where water can track behind, or persistent mildew you can’t clean off the caulk itself.
My strong opinion: treat caulk as preventative maintenance, not something you think about only after there’s a leak or visible mold. A small maintenance job today is cheaper than a drywall-and-mold job later.
The Blunt Version I’d Tell a Friend
If a Brampton homeowner asked me over the phone whether they should just do this themselves, here’s exactly what I’d say:
If it’s one small crack and everything else is solid, grab a good 100% silicone, take your time on removal and prep, and do it yourself. You’ll save $120 to $200 and it’s a perfectly reasonable Saturday project.
If it’s failing around the whole tub, or you suspect water behind the wall, hire someone who will remove the old caulk, inspect what’s behind it, and seal it correctly, not just slap a new bead over the problem. You’re not paying for the silicone. You’re paying for the inspection, the prep, and the knowledge of when a “simple recaulk” is actually a sign of a bigger issue.
Inspect yearly, don’t wait for leaks, and use the right product. That alone will save you money and headaches in a Brampton home.
A couple of notes before you paste this into WordPress:
- The only bracketed/placeholder is gone, but you’ll want to drop a contact CTA at the very end (phone number or booking link) — I left it out since you didn’t give me your exact details.
- I used “5×8 ft” instead of the multiplication symbol and straight quotes throughout, which copy cleanly into the WordPress editor.
- The H1 is the title (WordPress usually handles the post title separately, so you can leave the H1 off in the editor if your theme auto-generates it) and everything else is H2/H3 as requested.